
In the ever-evolving world of nail art, ombré nails have emerged as a captivating trend that has taken the beauty industry by storm. This mesmerizing technique involves a seamless transition of colors, creating a gradient effect that exudes elegance and sophistication. Whether you’re a nail art enthusiast or simply seeking to elevate your style game, ombré nails offer a canvas for creativity and self-expression. Join us as we embark on a comprehensive exploration of this enchanting art form, unveiling its techniques, inspirations, and endless possibilities.
The Art of Ombré Nails: Techniques and Inspiration
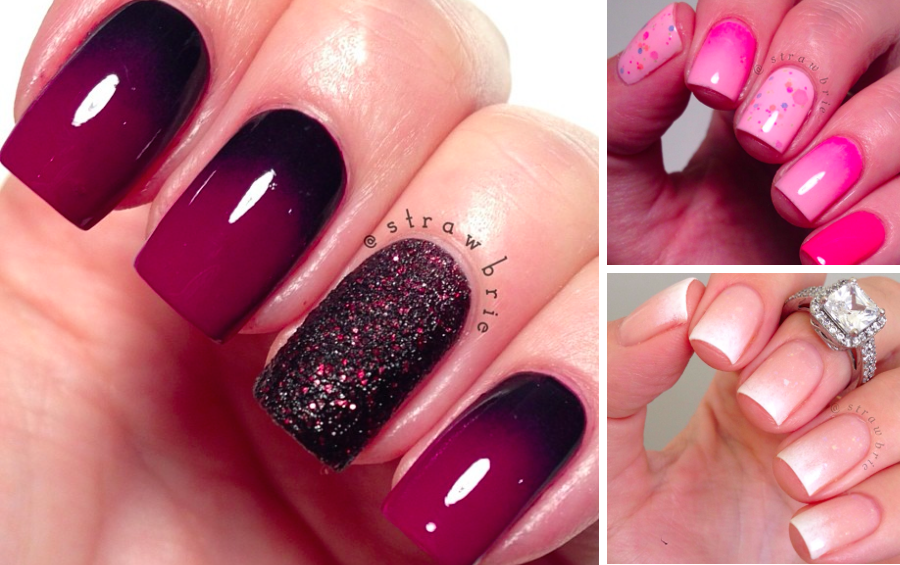
The Ombré Effect: A Gradient of Beauty
The ombré effect is achieved by blending two or more colors together, resulting in a seamless transition from one shade to another. This gradient can be vertical, horizontal, or even diagonal, allowing for endless creative possibilities. The beauty of ombré nails lies in their ability to create depth and dimension, transforming ordinary nails into works of art.
Sponging Technique
One of the most popular techniques for achieving the ombré effect is the sponging method. This involves applying different nail polish colors onto a makeup sponge and gently dabbing the sponge onto the nails, creating a seamless gradient. This method is perfect for beginners and ensures a flawless, blended look.
Brush Technique
For those seeking more control and precision, the brush technique is an excellent choice. This method involves carefully blending the colors directly onto the nails using a brush, allowing for intricate designs and patterns. With practice, the brush technique can produce stunning ombré nails that showcase your artistic skills.
Inspiration from Nature
Nature is a boundless source of inspiration for ombré nail art. From the vibrant hues of a sunset to the delicate shades of a blooming flower, the natural world offers a plethora of color combinations to explore. Incorporate earthy tones or opt for bold, vibrant shades – the possibilities are endless.
Geometric Patterns and Abstract Designs
Ombré nails can also be elevated by incorporating geometric patterns and abstract designs. Combine the gradient effect with intricate lines, shapes, or even negative space for a truly unique and contemporary look. This fusion of ombré and geometric elements creates a striking contrast that is sure to turn heads.
Step-by-Step Ombré Nail Tutorial for Beginners

Preparation and Tools
Before diving into the ombré nail tutorial, it’s essential to gather the necessary tools and materials. You’ll need:
- Nail polish in various shades (typically three or more colors)
- Base coat and top coat
- Makeup sponge or a small brush for blending
- Nail file and buffer
- Cuticle pusher or cotton buds
Ensure your nails are clean, trimmed, and shaped to your preference.
Step 1: Apply the Base Color
Begin by applying a base coat to protect your nails and ensure long-lasting results. Next, paint your nails with the lightest shade of polish, allowing it to dry completely.
Step 2: Create the Gradient
Using a makeup sponge, apply the second and third colors onto different sections of the sponge. Gently dab the sponge onto your nails, starting from the tip and working your way towards the cuticle. The colors will blend together, creating a beautiful gradient effect.
Step 3: Refine and Blend
If you notice any harsh lines or uneven blending, use a small brush to gently blend the colors together. This step allows you to create a seamless transition and achieve the desired ombré look.
Step 4: Add Details and Embellishments
Once you’ve achieved the perfect ombré effect, consider adding intricate details or embellishments to your nails. Try incorporating glitter, rhinestones, or even hand-painted designs for a touch of glamour and personalization.
Step 5: Seal with a Top Coat
To ensure your ombré nails last, apply a high-quality top coat. This will not only protect your artwork but also add a glossy, professional finish.
Unveiling the Secrets of Ombré Nails

Color Theory and Complementary Shades
Understanding color theory is crucial when creating stunning ombré nail designs. Complementary colors, which are opposites on the color wheel, can create a striking contrast and depth when used together. Experiment with different color combinations to find the perfect palette that suits your style and mood.
Ombré Nail Shapes and Lengths
The shape and length of your nails can greatly impact the overall appearance of your ombré design. While ombré nails look stunning on various nail shapes, some styles may be more conducive to showcasing the gradient effect. For instance, longer nails provide a larger canvas for intricate ombré patterns, while shorter nails can create a chic and understated look.
Ombré Nail Maintenance and Touch-ups
Like any nail art, ombré nails require proper maintenance to keep them looking their best. Regular touch-ups and reapplication may be necessary as your nails grow out. To extend the lifespan of your ombré nails, be sure to use a high-quality base coat and top coat, and avoid excessive exposure to water and harsh chemicals.
Ombré Nails: The Ultimate Trend Guide

Classic Ombré Nails
Classic ombré nails feature a seamless transition from one shade to another, often using complementary or analogous colors. This timeless style is perfect for those seeking a sophisticated and elegant look.
| Color Combination | Description |
|---|---|
| Nude to Deep Red | A subtle yet striking ombré that transitions from a soft nude to a rich, deep red. |
| Pastel Shades | Combine soft, muted tones like baby blue, mint green, and pale pink for a delicate and feminine ombré. |
| Vibrant Brights | Go bold with a vibrant ombré featuring bright hues like hot pink, neon yellow, and electric blue. |
Reverse Ombré Nails
For a unique twist on the classic ombré, try the reverse ombré technique. Instead of transitioning from light to dark, this style starts with a darker shade at the base and gradually lightens towards the tips.
- Dark Purple to Lavender
- Deep Blue to Sky Blue
- Burgundy to Peach
Glitter Ombré Nails
Add a touch of glamour to your ombré nails by incorporating glitter or shimmery shades. This eye-catching style is perfect for special occasions or when you want to make a statement.
- Gold to Silver Glitter Ombré
- Rose Gold to Champagne Ombré
- Holographic Glitter Ombré
Celebrities’ Guide to Ombré Nails
Ombré nails have become a beloved trend among celebrities, gracing the red carpets and magazine covers. From Hollywood starlets to music icons, these trendsetters have embraced the ombré nail art, inspiring beauty enthusiasts worldwide.
Kylie Jenner’s Signature Ombré Nails
Kylie Jenner, the beauty mogul and reality TV star, is renowned for her love of ombré nails. Her signature style often features a nude-to-brown or pink-to-burgundy ombré, perfectly complementing her glamorous aesthetic.
Rihanna’s Bold Ombré Nail Looks
Never one to shy away from bold fashion choices, Rihanna has rocked various ombré nail designs over the years. From vibrant red-to-orange ombré to metallic silver-to-black ombré, her nail art reflects her fearless and eclectic style.
Jennifer Lopez’s Timeless Ombré Elegance
Jennifer Lopez is a true icon when it comes to ombré nails. Her go-to look is often a classic nude-to-pink or nude-to-red ombré, showcasing her timeless elegance and sophistication.
Ombré Nails for Every Occasion: From Weddings to Parties

Bridal Ombré Nails
For brides seeking a touch of elegance and romance on their special day, ombré nails are the perfect choice. A soft, delicate ombré in shades of white, ivory, or blush pink can complement any bridal ensemble and add a touch of whimsy to your wedding day look.
Party Ombré Nails
When it’s time to let loose and celebrate, party ombré nails are the way to go. Bold, vibrant colors like neon pink, electric blue, or metallic hues can add apop of fun and excitement to your party ensemble. Consider adding glitter or rhinestones for extra sparkle and glamour that will make your nails the life of the party.
Casual Ombré Nails
For everyday wear or more laid-back occasions, opt for casual ombré nails in soft, subtle shades. Pastels, nudes, or muted tones like lavender, sage green, or dusty rose are perfect for a relaxed yet polished look that can easily transition from day to night.
Holiday Ombré Nails
Get into the festive spirit with holiday-themed ombré nails. Whether it’s Christmas, Halloween, or Valentine’s Day, you can create ombré designs using traditional holiday colors like red and green, black and orange, or pink and red. Add themed nail art like snowflakes, pumpkins, or hearts for an extra festive touch.
Mastering Ombré Nail Designs: Tips from Professionals

Use High-Quality Products
When creating ombré nails, investing in high-quality nail polishes and tools is essential for achieving a flawless finish. Look for polishes that are highly pigmented and blend easily to create a smooth gradient. Quality tools like makeup sponges, detail brushes, and dotting tools can also help you achieve precise and professional-looking results.
Practice Patience and Precision
Mastering ombré nail designs takes practice, patience, and attention to detail. Take your time when blending colors and refining the gradient to ensure a seamless transition. Start with simple color combinations and techniques before experimenting with more complex designs.
Experiment with Different Techniques
There are various techniques you can use to create ombré nails, from sponge gradients to brush blending and even watercolor effects. Experiment with different methods to find the one that works best for you and allows you to achieve the desired ombré look. Don’t be afraid to mix and match techniques for unique and creative designs.
Seek Inspiration and Education
Stay inspired and informed by following nail artists and professionals on social media, attending workshops or classes, and practicing new techniques regularly. Drawing inspiration from others and learning from experienced professionals can help you expand your skills and creativity in ombré nail art.
Latest Trends in Ombré Nails: Colors and Techniques

Monochromatic Ombré
A modern twist on traditional ombré nails, monochromatic ombré features varying shades of the same color family. From light to dark hues, this subtle yet sophisticated style creates a cohesive and harmonious gradient that is perfect for any occasion.
- Blush to Burgundy
- Mint Green to Forest Green
- Sky Blue to Navy
Geometric Ombré Patterns
Add a contemporary edge to your ombré nails with geometric patterns and shapes. From chevron stripes to geometric grids, incorporating graphic elements into your ombré design can elevate the look and create a visually striking effect.
- Chevron Ombré
- Triangle Fade
- Diamond Gradient
Negative Space Ombré
Negative space nail art continues to be a popular trend, and combining it with ombré nails creates a chic and minimalist look. Leave portions of your natural nail exposed or incorporate negative space designs like cutouts, lines, or shapes into your ombré manicure for a modern and edgy style.
Watercolor Ombré
Embrace a soft and dreamy aesthetic with watercolor ombré nails. By blending pastel shades together using a watercolor technique, you can achieve a ethereal and artistic ombré design that resembles a delicate wash of color on your nails.
Ombré Nails: The Perfect Way to Add a Touch of Glamour

Ombré nails are a versatile and stylish nail art technique that can elevate your look and add a touch of glamour to any outfit. Whether you prefer classic ombré designs or want to experiment with bold colors and patterns, there are endless possibilities to express your personal style through ombré nails.
From subtle gradients to eye-catching embellishments, ombré nails offer a creative canvas for self-expression and individuality. Whether you’re getting ready for a special event, a night out with friends, or simply want to pamper yourself with a beautiful manicure, ombré nails are the perfect choice for adding a touch of glamour to your fingertips.
With the right techniques, tools, and inspiration, you can master the art of ombré nails and create stunning designs that showcase your creativity and style. So why wait? Embrace the ombré trend and let your nails shine with glamour and sophistication.
Conclusion

In conclusion, ombré nails continue to be a popular and versatile nail art trend that offers endless possibilities for creativity and self-expression. Whether you’re a beginner looking to try your hand at ombré nail designs or a seasoned nail enthusiast seeking inspiration for your next manicure, there are countless techniques, colors, and styles to explore in the world of ombré nails.
By mastering the art of ombré nails and unveiling the secrets behind creating seamless gradients, choosing complementary colors, and experimenting with different techniques, you can elevate your nail game and showcase your unique sense of style. Whether you prefer classic ombré designs, bold and vibrant colors, or intricate patterns and embellishments, there’s an ombré nail look for every occasion and mood.
So go ahead, unleash your creativity, and embrace the beauty of ombré nails. With a little practice, patience, and passion for nail art, you can achieve stunning ombré designs that will make your fingertips the envy of all. Let your nails be your canvas, and let the art of ombré nails take your manicures to the next level.


